Setting up eSIM on iPhone has become a vital skill these days. The iPhone 17’s move toward an eSIM-only future means users need to become skilled at using this technology that enables uninterrupted global connectivity.
The process of installing eSIM on iPhone matters more than ever now. You might have a new device or want to upgrade your current one. The good news is that most recent iPhones support this feature. The compatible devices include iPhone 17 / 17 Air / 17 Pro / 17 Pro Max, iPhone 16 / 16 Plus / Pro / Pro Max, iPhone 15 series, and iPhone 14 models. The support extends to older models too – iPhone 13, 12, 11, XS, and XR all work with eSIM.
Apple keeps expanding eSIM support to new regions. Learning to download eSIM on your iPhone helps you stay connected anywhere you go. This piece guides you through everything about setting up and managing eSIMs on your device. We’ve included simple, step-by-step instructions that cover compatibility checks and digital SIM activation.
Check If Your iPhone Supports eSIM
You should check if your iPhone supports eSIM technology before downloading one. Not every iPhone model comes with eSIM capabilities, and availability varies by region.
List of iPhone models with eSIM support
The iPhone lineup first got eSIM technology in 2018. These iPhone models support eSIM:
- Newest models: iPhone 17 series, iPhone Air, iPhone 16 series (including 16e)
- 2023 models: iPhone 15, 15 Plus, 15 Pro, 15 Pro Max
- 2022 models: iPhone 14, 14 Plus, 14 Pro, 14 Pro Max
- 2021 models: iPhone 13, 13 mini, 13 Pro, 13 Pro Max
- 2020 models: iPhone 12, 12 mini, 12 Pro, 12 Pro Max, iPhone SE (2nd gen)
- 2019 models: iPhone 11, 11 Pro, 11 Pro Max
- 2018 models: iPhone XR, XS, XS Max
iPhone 14 and newer models in the US don’t have physical SIM trays, making them eSIM-only devices. Some regional variants, especially those in mainland China, might not work with eSIM technology.
How to check if your iPhone is carrier unlocked
Your iPhone needs to be unlocked to use an eSIM. Here’s a quick way to check:
- Open the Settings app
- Tap General, then About
- Scroll down to find “Carrier Lock”
- If it shows “No SIM restrictions,” your iPhone is unlocked
You’ll need to ask your carrier to unlock your device if you don’t see this confirmation. Only carriers can provide this service.
What is an EID and why it matters
The EID (Embedded Identity Document) is your eSIM chip’s unique 32-digit identifier that’s built in during manufacturing. You can think of it as your eSIM’s digital fingerprint.
The EID’s importance comes from its key functions. A device with an EID supports eSIM, and it handles three critical tasks:
- Device Authentication: Makes sure eSIM profiles are set up correctly
- Security: Works as a unique encrypted identifier
- Activation: Lets you set up eSIM remotely
You can find your EID in Settings > General > About under the Digital SIM section. Another way is to dial *#06# on your keypad – if you see an EID next to your IMEI numbers, your iPhone supports eSIM.
Carriers often need your EID number to activate your eSIM on iPhone.
Need an eSIM? Get 30% off any Nomad eSim plan using the code JACK92CB
Get Ready to Install eSIM on iPhone
Your iPhone needs proper preparation to set up an eSIM smoothly. The setup process requires attention to a few key details that help you avoid common installation problems.
Ensure stable internet connection
You need a reliable internet connection to install an eSIM on your iPhone. Remote activation and provisioning of eSIMs demand a stable connection throughout the setup process.
Connect to a trusted Wi-Fi network before you start the installation. Wi-Fi offers better stability than cellular data. Your carrier profile download might fail if you have poor connectivity.
iPhone 13 users must have a Wi-Fi network to activate eSIM. Users of iPhone 14 and newer models should also use Wi-Fi. So if you plan to travel, download your eSIM profile 1-2 days before you leave while you still have good internet.
Update to the latest iOS version
The latest iOS version supported by your iPhone is crucial. Your eSIM works better with recent software updates that fix bugs and improve functionality.
To check for updates:
- Go to Settings > General > Software Update
- Download and install any available updates
- Restart your device after updating
Your eSIM installation might face compatibility issues with outdated software. This quick update prevents many setup problems.
Have your QR code or activation details ready
Get all your eSIM activation materials ready before installation begins. Your carrier will provide one of these options:
- QR code from your carrier (usually sent via email)
- Manual activation details, including SM-DP+ address and activation code
- Carrier app or direct installation link (for iOS 17.4+ on certain carriers)
Keep the manual details handy if you can’t scan a QR code. Your confirmation email contains the SM-DP+ address and activation code. Make sure these details are available on another device since you’ll need them during setup.
How to Install eSIM on iPhone: 3 Easy Methods
Your iPhone is ready, so let’s look at three main ways to set up an eSIM on your device. Each method has its own benefits based on what works best for you.
Need an eSIM? Get 30% off any Nomad eSim plan using the code JACK92CB
Method 1: Use your carrier’s app or direct link
iPhone users with iOS 17.4 or later will find this the easiest way to install. Many carriers now make eSIM activation quick through:
- Direct activation links – A tap on the carrier’s link starts the automatic eSIM setup. You’ll see an “Activate New eSIM” notification – just tap Allow and then Continue.
- Carrier apps – Get your provider’s official app from the App Store. The app helps you move your number or set up a new eSIM without any code scanning.
This method works great for users who want a simple setup process.
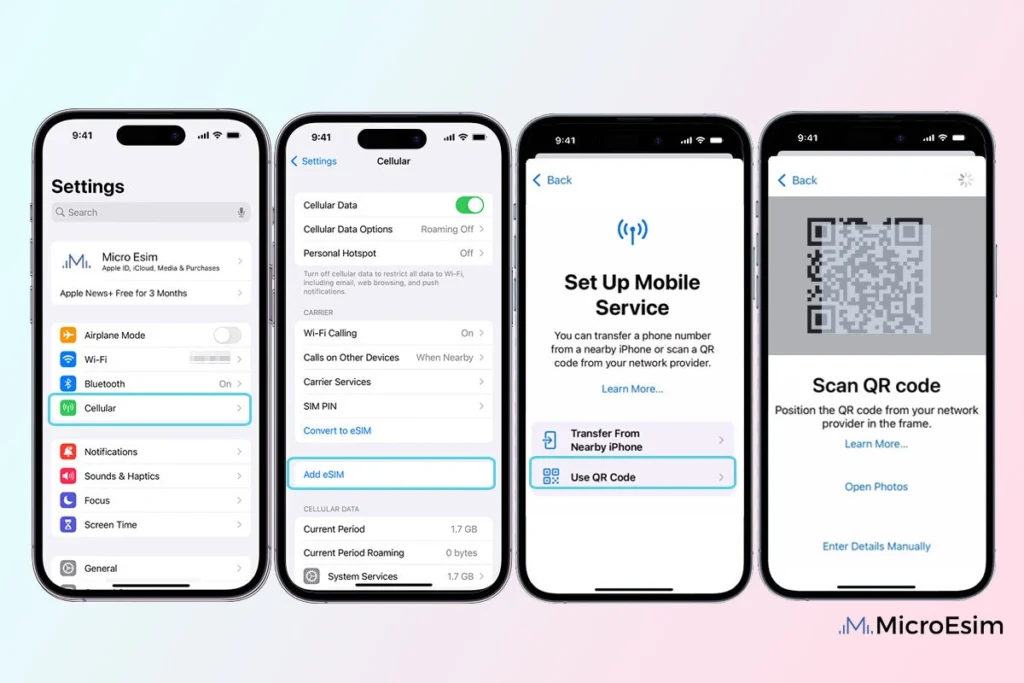
Method 2: Scan a QR code from your provider
This reliable method works with all eSIM-compatible iPhones:
- Go to Settings > Cellular > Add eSIM
- Select “Use QR Code”
- Scan the QR code provided by your carrier
- Follow on-screen prompts until activation completes
Your iPhone’s camera reads the code and sets up everything automatically with the right settings.
Method 3: Enter details manually in settings
Manual setup is a solid option if you can’t use QR codes or apps:
- Go to Settings > Cellular > Add eSIM
- Tap “Enter Details Manually” at the bottom
- Input the SM-DP+ address (first part between two $ symbols)
- Enter the Activation Code (after the second $ symbol)
- Leave Confirmation Code empty (unless specifically provided)
- Tap Next and follow on-screen instructions
This approach needs careful attention but gives you full control over the setup.
Activate and Manage Your eSIM Settings
A proper setup of your eSIM after installation will give you the best performance and help avoid unexpected charges. You’ll need to pay attention to several important settings when you manage multiple lines.
Set your default line for calls and data
Here’s how to pick which line handles your calls and data:
- Go to Settings > Cellular
- Tap Cellular Data and select your preferred eSIM
- For calls, tap Default Voice Line and choose your primary number
This setup comes in handy if you use multiple plans or travel often. Remember that you can only use one mobile number at a time for calls or cellular data.
Label your eSIMs for easy switching
Clear labels will make it simple to manage multiple eSIMs:
- Go to Settings > Cellular
- Select the eSIM you want to rename
- Tap Cellular Plan Label
- Choose a preset option (Business, Personal) or create a custom label
Turn off data switching to avoid roaming charges
You can avoid surprise roaming fees by turning off data switching:
- Go to Settings > Cellular > Cellular Data
- Turn off Allow Cellular Data Switching
- On top of that, select your travel eSIM line and disable Data Roaming
This step stops your device from connecting to expensive networks automatically while you’re abroad.
How to reset or remove an eSIM
If you face connection problems or switch carriers:
- Go to Settings > Cellular
- Select the problematic eSIM
- Tap Remove Cellular Plan and confirm
Make sure to restart your iPhone before you try to reinstall the eSIM.
Need an eSIM? Get 30% off any Nomad eSim plan using the code JACK92CB
Conclusion
Setting up an eSIM on your iPhone might seem complex at first. Once you do these steps, you’ll quickly become skilled at using this technology. The change to eSIM-only devices makes this knowledge crucial for anyone with newer iPhone models.
You need to check compatibility, prepare your device, and pick the right installation method to stay connected everywhere. On top of that, managing your eSIM’s settings properly will prevent unexpected charges during travel and make switching between plans easier.
Note that each installation method has its own advantages based on your situation. Your carrier’s app works best when you want simplicity. QR code scanning gives reliable setup with most eSIM-compatible devices. Manual setup needs more attention but gives you total control of the process.
Take time to label your eSIMs and set up default lines for calls and data. These simple steps will substantially improve your experience with multiple cellular plans.
eSIM technology shapes the future of mobile connections. This knowledge helps you confidently use this digital solution and enjoy your iPhone’s flexibility. Your eSIM setup skills prove valuable as physical SIM cards fade away, whether you travel internationally or manage multiple numbers.